Write values and control a program
Write a register, a variable or a signal with a confirmation and a report, change values in the Watch view and write them together, run a program from a line, hold, continue and abort, reset the alarms, and what the Fanuc and Yaskawa controllers refuse.
- What every action does
- Write a value
- The report of a write
- Simulate an I/O signal (Fanuc)
- Edit values in the Watch view
- Control a program
- Run a program, or run it from a line
- Run a program from the list
- Reset alarms
- What differs between the brands
- Yaskawa: the remote mode must be on
- Fanuc: "Not resumed"
- What to read next
This page explains how to write a value to a controller, how to run, hold, continue or abort a program, and how to reset the alarms, from the views of TouchUp. It applies to Fanuc and Yaskawa controllers, with the differences listed below. Every action asks you to confirm first, and nothing is sent when you cancel.
What every action does
These actions follow the steps of every write: your command, the license, a confirmation dialog, the action, then a line in the audit log. See Send a file to the controller for the steps.
- A write needs the Pro edition for the brand of the controller. Reset Alarms is free. See Editions and license.
- The confirmation dialog shows the controller, its mode, and what will happen. The button
Cancelhas the focus: pressing Enter once never writes a value and never starts a program. - Each time you run an action, TouchUp asks again. It never remembers a confirmation.
- A command that the controller cannot do stays in the menu. When you run it, TouchUp says why, and sends nothing.
- When the controller does not answer after the action was sent, TouchUp says that the outcome is unknown. Check the controller before you try again.
Write a value
You can write a register, a variable or a signal, on the active controller. In the Watch view, you can change the values of several controllers, then write them together: see Edit values in the Watch view.
- In the Data or I/O panel, click a cell and type the new value, then
Write N changed values: see Data and I/O panels. To write one value by its name, runTouchUp: Write Value...from the palette. - Type the new value. The field starts with the current value. For a position register, which is a text on several lines, you type a new position as text. The position editor is the easier way: it shows the Cartesian and joint values in fields, with the same confirmation, copy of the old value and audit log, and checks the values before it writes.
The values of a VAR.DAT table and of a Fanuc .va tree are written the same way: edit them in the table or in the tree, then Write N changed values. See Parameter and variable files.
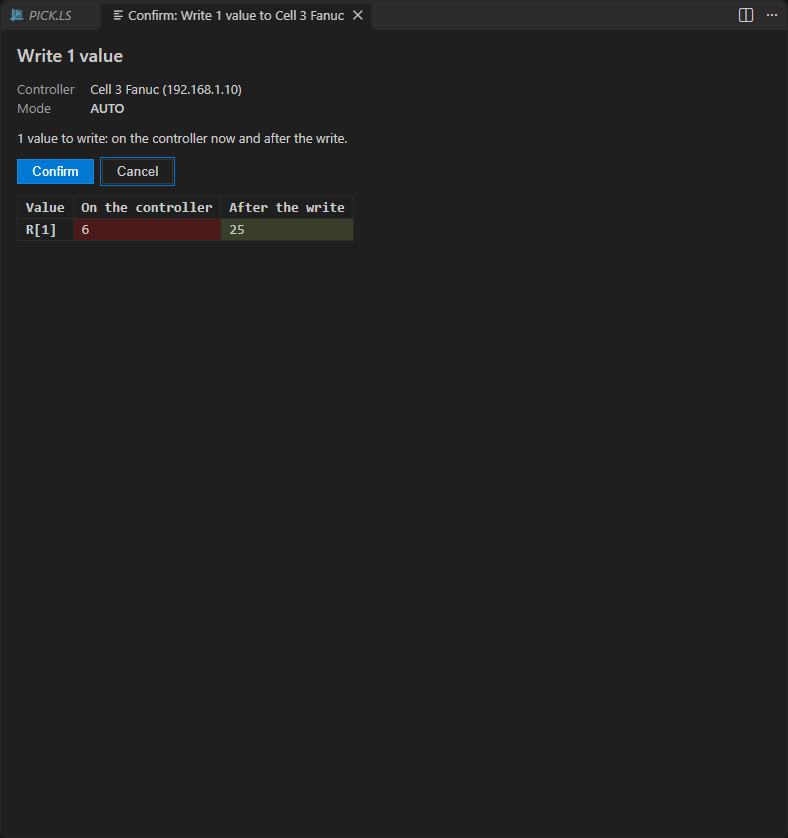
3. The confirmation dialog shows a table: the reference, its value on the controller now, and its value after the write.
4. Click Confirm.
The command TouchUp: Write Value... in the palette does the same for a reference that you type. The prompt and the examples follow the brand of the active controller: on a Fanuc controller, "Register, variable or I/O signal to use on the controller" with the examples R[5], PR[3], DO[1] and $PARAM_GROUP[1].$PAYLOAD; on a Yaskawa controller, "Variable or I/O signal to use on the controller" with B005, I010, P023 and OT#(1). A text that is not a reference gives a message that says what to type, for example "Type a register, variable or I/O signal, for example R[5]."
The report of a write
After the write, TouchUp reads the value again and reports the value that the controller holds, not the text you typed: the controller can round it.

| Result | What TouchUp shows |
|---|---|
| Written | TouchUp: R[1] = 25. If the value cannot be read back, the line says not read back with the reason |
| Refused | An error: 0 of 1 values written. Refused: R[1] (reason). The reason is the message of the controller, with the action to take when TouchUp knows one |
| No answer | An error that says the value may have been written: check the controller before you try again |
Simulate an I/O signal (Fanuc)
In the I/O panel of a Fanuc controller, the buttons Simulate and Unsimulate of a signal that can be simulated run Simulate I/O and Unsimulate I/O. A simulated signal shows simulated after its comment. A Yaskawa controller has no simulation of a signal: TouchUp refuses the command and says so.
Edit values in the Watch view
In the Watch view, you validate a value, then you confirm the write. The pencil Edit Value... of a row (or Edit Value... in its right-click menu) keeps the new value as a pending value and opens the confirmation at once. Nothing is sent before you confirm.
- Put the pointer on a row of the Watch view and click the pencil. The field starts with the value read now. Type the new value and press
Enter. - The confirmation of that controller opens at once. Its table lists every pending value of that controller, not only the one you just typed: the value on the controller now and after the write.
- Confirm to write the values, or click
Cancelto keep them pending.
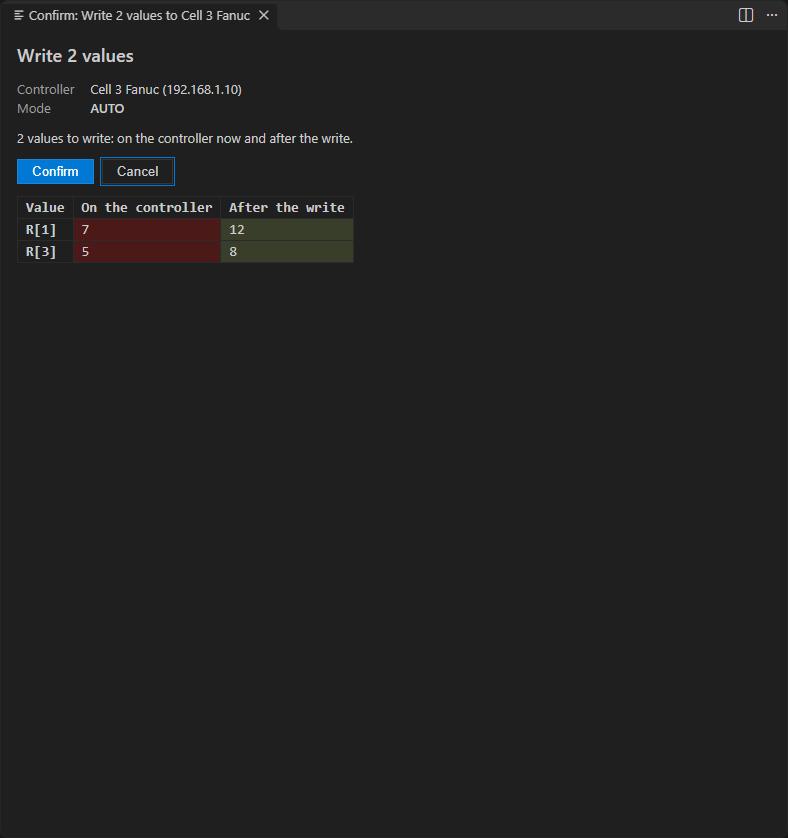
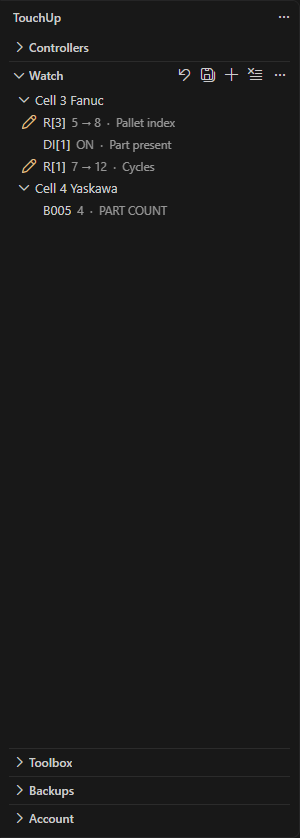
After Cancel, all the values stay pending. The row shows the value read, an arrow, then the new value, for example 5 → 8, with a mark and another color. A value that cannot be written shows a warning with the reason. The next edit of a value opens the confirmation again, with all the pending values of that controller.
The confirmation is for one controller: the controller of the value you validated. The pending values of another controller wait until you edit one of its values, or until you use the title of the view.
The title of the view shows the buttons Write Changed Values and Revert All, and the number of changed values. Write Changed Values opens the confirmation for the pending values of every controller, one confirmation for each controller, in the order of the Watch view. Use it to write again after a Cancel, without a new edit. Click Cancel and the next controllers are not asked: their values stay pending.
| Command | What it does |
|---|---|
Revert | Right click a changed row: the new value is dropped, the row shows the value read again |
Revert All | Drops every pending value |
Write Changed Values | Opens the confirmation of every controller that has pending values, one after the other |
- A value that was written leaves the list of the pending values, and TouchUp reports the value read back, as for any write.
- A value that is refused, or whose write failed, stays pending, with a sentence that says why. Fix the cause, then edit a value again or click
Write Changed Values. - When the controller does not answer, the sentence is
The outcome is unknown: the value may have been written, check the controller before you write again. - A value that you change while the dialog is open is not sent. It stays pending.
- While a confirmation is open, no second one opens: a new edit stays pending, and a click on
Write Changed Valuessays that a write is already in progress. - Pending values live in the window only. They are lost when the window is reloaded, and a value that you remove from the Watch loses its pending value.
- The panels and the tables of files keep their own
Writebutton. They do not open a confirmation at each edit.
Nothing is written before you confirm. The steps of every write apply: the Pro edition, the confirmation, the audit log with a line for each value. A user of the free edition can change values, and the confirmation then shows the text of TouchUp Pro and sends nothing. See Editions and license.
Control a program
The commands of the program control are in the right-click menu of a connected controller in the Controllers view, and in the palette.
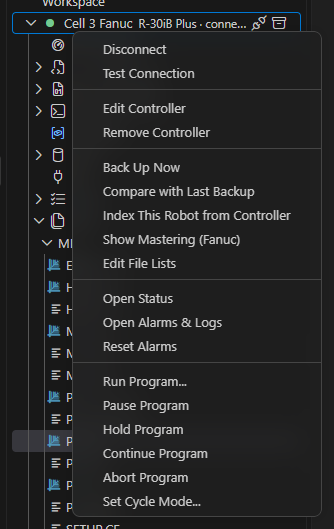
| Command | What it does |
|---|---|
Hold Program | Stops the robot and holds the running programs. Continue starts them again from where they stopped |
Continue Program | Releases the hold and starts the programs again |
Abort Program | Ends all programs. They cannot continue from where they stopped: the next start runs from a line |
Run Program... | Starts a program, from its first line or from a line |
Pause Program | Pauses the running programs. Continue Program starts them again |
Set Cycle Mode... | Chooses Step (one line, then wait), Cycle (one cycle, then stop) or Continuous (repeat until stopped) |
Starting, or continuing, a program can move the robot. The dialog says so: check that the cell is clear and safe first. TouchUp shows the mode of the controller in the dialog, so you see it before you confirm.
When the action is done, TouchUp shows TouchUp: <action>: done. The Tasks node then shows the new state of the tasks.
Run a program, or run it from a line
Run Program... asks for the program and, if you want, a line: PICK starts from the first line, PICK 5 from line 5. On a Yaskawa controller it asks for the job: MAIN starts from the first line, MAIN 5 from line 5. When a program of the controller is open, its name is proposed. Lines count from 1.
To start from the line where you are, open the program from the controller (see Open controller files), put the cursor on an instruction, and run Run from Here. It is in the right-click menu of the editor, in the right-click menu of the line numbers, and in the palette.
- The program must have no unsaved change. TouchUp says "Send or revert the changes first": the line must be the one of the program on the controller.
- The cursor must be on an instruction, not on a comment or an empty line.
Run a program from the list
A program of TP Programs (Fanuc), a job of Programs (Yaskawa) and a task of Tasks have a Run button on their row and the command Run Program in their right-click menu. It is the same command as Run Program... of the controller, with the program already chosen: the same license, the same confirmation, the same audit log.
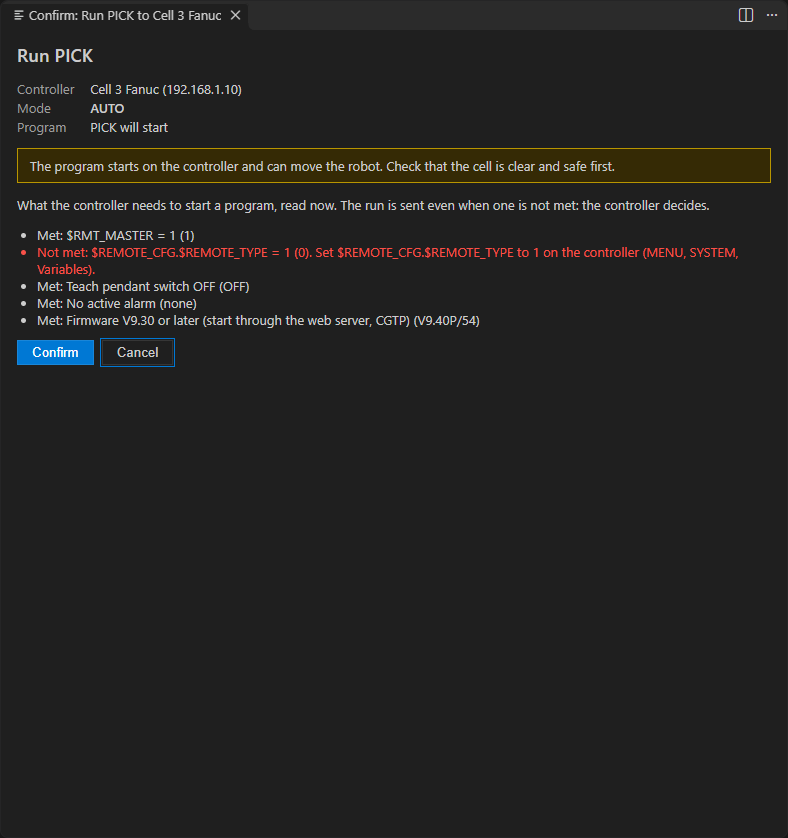
Before it asks, TouchUp reads the conditions that the controller needs, without writing anything, and lists them in the confirmation, under the line "What the controller needs to start a program, read now." Each one is Met, Not met or Unknown, and a condition that is not met says what to do.
| Brand | Conditions shown |
|---|---|
| Fanuc | $RMT_MASTER equal to 1, $REMOTE_CFG.$REMOTE_TYPE equal to 1, the teach pendant switch off, no active alarm, and, for the web server of the controller, firmware V9.30 or later |
| Yaskawa | The remote mode is on |
A condition that is not met never blocks the run. The controller decides, and it can start the program anyway, for example with an alarm. TouchUp sends the command when you confirm. TouchUp never changes these variables: you do it on the controller.
After the command:
- If the controller answers, TouchUp shows
TouchUp: run: the controller accepted the run. - If the controller refuses, the message names each condition that is not met, with the value read and what to do. When every condition is met, it says that the controller gave no reason.
- If TouchUp refuses before it sends anything, for example a bad program name, or a run from a line while the web server is turned off in the options of the controller, the message gives only that cause and ends with "nothing was sent to the controller".
In the Free edition the button shows a lock: a click opens the dialog of the Pro edition and nothing is sent, see Editions and license. On a Yaskawa controller whose remote mode is off, the button and the menu entry are greyed, and the tooltip of the row gives the reason: see Yaskawa: the remote mode must be on.
Reset alarms
Reset Alarms resets the active alarms of the controller. It is in the right-click menu of a connected controller in the Controllers view, next to the program commands. It is free: it needs no license.
The dialog asks you to check the cause of each alarm and the state of the cell first. An alarm that is still caused comes back. See Alarms and logs to read the alarms.
What differs between the brands
| Fanuc | Yaskawa | |
|---|---|---|
| Hold | Needs a route that the controller offers, for example the web server from firmware V9.30. Without it, the command says why | Hold Program and Pause Program are the same function of the controller |
| Run from a line | Needs the web server of the controller, which TouchUp uses unless you turned it off in the options of the controller | TouchUp selects the job at the line, then starts it. If the start is refused, the job stays selected and the message says it |
| Abort | Yes | No. The controller has no remote abort of a job: stop the job on the pendant |
| Set cycle mode | No. A Fanuc controller has no cycle mode to set | Yes |
| Teach pendant and mode | The controller refuses a start while the teach pendant is enabled or the mode is local | The controller refuses a command when the mode is not play or the servo is off |
Yaskawa: the remote mode must be on
A Yaskawa controller takes Run Program..., Hold Program, Pause Program, Continue Program, Set Cycle Mode... and Reset Alarms only when its remote mode is on. When it is off, each of them stays in the menu and shows:
Nothing is sent. Turn the remote on, then run the command again. The connection report of TouchUp: Test Connection shows the remote mode too: see When the connection fails. Reading values and files works with the remote mode off.
Fanuc: "Not resumed"
After Continue Program, TouchUp looks at the tasks of the Fanuc controller. When a task is still held after a moment, the controller did not resume it, and TouchUp does not say "done". It shows an error that starts with Not resumed, names the task, its program and its line, and adds the active alarms:
Do what the message says. Check the active alarms (TouchUp: Open Alarms & Logs), the state of the teach pendant and the mode of the controller. When the cause is not clear, continue the program from the teach pendant.
What to read next
- Read live values, the views where you write a value
- Data and I/O panels, to edit many values and write them with one confirmation
- Edit a position, to write a position register or a position of a program
- Alarms and logs
- Send a file to the controller, the steps of every write and the audit log
- Editions and license