Install TouchUp
The files of a release: the VS Code extension, the Windows setup and MSI, the Linux AppImage and the portable packages, and how to start the web application on your PC or for the PCs of your network, over HTTPS, and why TouchUp opens only folders of the computer that runs it. Nothing else to install.
TouchUp is installed as an extension of VS Code, or as a desktop or web application on Windows and Linux. This page lists the files of a release, what each one installs and how to remove it.
Files of a release
Each release of TouchUp contains these files. <version> is the number of the release.
| File | System | Content |
|---|---|---|
touchup-win32-x64.vsix | Windows | The extension for VS Code |
touchup-linux-x64.vsix | Linux | The extension for VS Code |
touchup-<version>-win-x64-setup.exe | Windows | Installer of the desktop and web applications, for the current user |
touchup-<version>-win-x64.msi | Windows | The same applications as an MSI package, for the current user or for all users |
touchup-<version>-linux-x64.AppImage | Linux | The applications in one executable file |
touchup-<version>-win-x64.zip | Windows | Portable package, nothing to install |
touchup-<version>-linux-x64.tar.gz | Linux | Portable package, nothing to install |
touchup-<version>-<part>.cdx.json | All | Four files, one for the extension, one for the TouchUp service, one for the desktop application and one for the web application: the list of the software components of each, see Security and releases |
SHA256SUMS.txt | All | The checksum of every file of the release |
Each installer or package is complete: no other software is needed.
VS Code extension
Install
- Download the VSIX file of your system.
- In VS Code, open the Extensions view, click
...at the top, thenInstall from VSIX..., and select the file. Or, in a terminal:code --install-extension <file>.vsix. - The TouchUp icon appears in the activity bar, on the left.
VS Code 1.105 or later is needed. The workspace must be trusted: TouchUp connects to the controllers declared in the folder, and can write to them.
Install on a PC without internet
The PC of a robot cell often has no internet, and VS Code cannot download the extension there. Prepare the file on another PC:
- On a PC with internet, download the VSIX file of the system of the cell PC, from the files of the release or from the Marketplace page of TouchUp (the tab
Version Historyof a version). - Copy the file to the cell PC with a USB key or a share.
- On the cell PC, run
code --install-extension <file>.vsixin a terminal, or useInstall from VSIX...as above.
VS Code 1.105 or later must already be installed on the cell PC. TouchUp then works with no internet. A license also works offline, see Offline and privacy. To install a newer version, copy its VSIX and install it the same way. Your configuration files and your backups are kept.
Remove
In the Extensions view, right click TouchUp, then Uninstall. Your configuration files and your backups are kept.
Desktop and web applications
Windows
- Setup: run
touchup-<version>-win-x64-setup.exe. TouchUp is installed for the current user in%LOCALAPPDATA%\TouchUp, without administrator rights, with a shortcut in the Start menu and on the desktop. - MSI: run
touchup-<version>-win-x64.msiand choose "just for you" or "for all users" (administrator rights). Silent install:msiexec /i touchup-<version>-win-x64.msi /qn, addALLUSERS=1for all users. - Portable: extract the zip file and run
touchup.exe. Windows can block the files downloaded from the internet: runUnblock-TouchUp.ps1, at the root of the folder, once.
Install TouchUp with the setup or with the MSI, not both: they share the same folder and the same shortcuts.
Linux
- AppImage: make the file executable (
chmod +x), then run it. - Portable: extract the
tar.gzfile and runtouchup.
Web application
Run touchup-web (touchup-web.cmd on Windows) in the folder of the application. It starts the server and opens the browser at http://localhost:<port>/ (port 3000 by default, --port <n> changes it). Use localhost: the panels of TouchUp (the guide Add a controller, Status, the confirmation of a write) do not load at another address, such as 127.0.0.1. The server answers the PC that runs it only. In the web application, the files and the backups are on the PC that runs the server, not on the PC of the browser.
Open the web application to other PCs
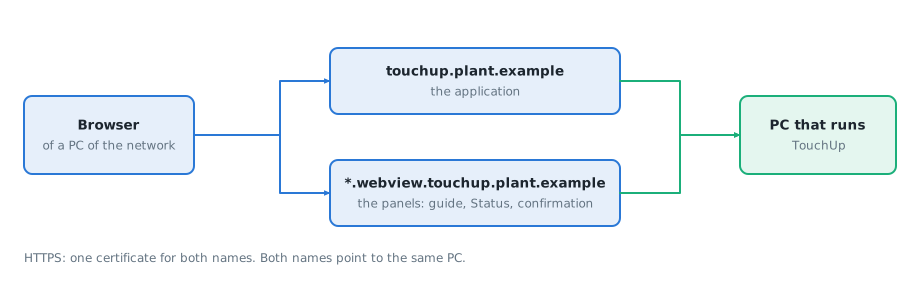
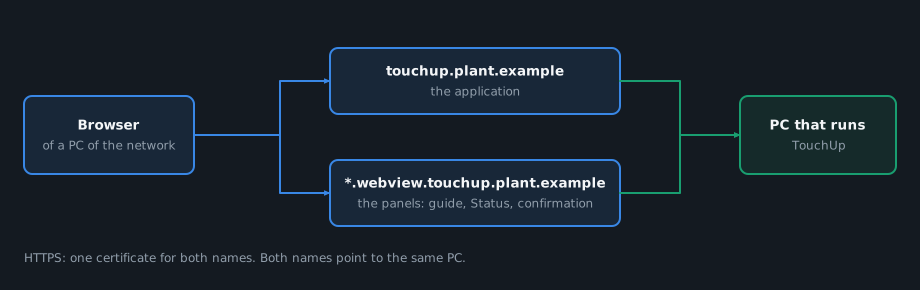
To let the PCs of your network use one web application, start it in network mode, over HTTPS, at a host name:
touchup --web --network --host touchup.plant.example --cert touchup.pem --key touchup.key
What the PC and the network need:
- A host name.
--hostis a DNS name with a dot, for exampletouchup.plant.example. It cannot be an IP address, a name without a dot, or a name that has the labelwebview. Use a name for TouchUp only, not a name that other applications share. - The panels. TouchUp shows its panels (the guide, Status, the confirmation of a write) at the name
*.webview.<name>, for example*.webview.touchup.plant.example. Both<name>and*.webview.<name>must point to the PC that runs TouchUp, in the DNS of your network or in thehostsfile of each client. - A certificate.
--certand--keyare the files (.pem) of a certificate whose alternative names are<name>and*.webview.<name>(a wildcard of one whole label), and that the browsers of the clients trust. TouchUp checks it at the start. - A current browser: Chrome or Edge 76, Firefox 90, Safari 16.4 or later. An older browser cannot sign in.
If a condition is not met, TouchUp stops at once and says which one: it never starts half working.
At the start, TouchUp prints the access address with a random access token, for example https://touchup.plant.example:3000/?token=.... Open this address in the browser. A new token is made at each start. Give it only to the people who may use the application: whoever has it can use the controllers that the application reaches, so treat it as a password. The address stays in the history of the browser. The browser is not opened for you in this mode.
Keep the PC that runs TouchUp safe:
- Block the outgoing SMB (ports 139 and 445) and WebDAV connections of the PC, at its firewall. A link to a shared folder of another computer, opened from an email or a document, must not make the PC connect to it.
- Allow the port of TouchUp (3000 or the one of
--port) from the PCs that need it only.
The network mode does not support IPv6 yet.
Folders of other computers
The desktop application and the web application open only folders of the computer that runs them. A folder on a share of another computer (\\server\share) is refused, whether it comes from the list of the recent folders, a .code-workspace file, the command line or the dialog Open Folder. TouchUp shows TouchUp opens only folders of the computer that runs it: the workspace on <host> was not opened. Copy the folder to that computer and open the copy. A folder of a .code-workspace file that is on another computer is left out of the workspace.
A link to TouchUp cannot choose the folder to open either: the part of the address after # is ignored. The folder comes from the command line, from the list of the recent folders, or from your choice in a dialog. A link in an email or a web page cannot make the PC connect to a computer of someone else.
Some cases stay possible, so keep the firewall rule above:
- Browsing or typing
\\server\sharein the dialogOpen Foldermakes the PC read that share to show it, because you asked for it. In network mode, this is possible for whoever has the access token. - A drive letter mapped to a share (
Z:), or a link inside a folder that points to a share, is a folder of the computer for TouchUp. Do not open a folder that you do not trust.
First start
On the first start, the desktop and web applications open with the guide Add a controller as the welcome page, see Connect to your first controller, and with the Problems panel in the bottom panel, so that the problems that TouchUp finds in a program are in sight. Your own layout is kept at the next starts: if you close the panel or move it, it stays as you left it.
Settings of the application
The desktop application keeps its own settings (the settings of the application, the keyboard shortcuts, the recent workspaces and the storage of the extensions) in ~/.touchup/desktop (on Windows %USERPROFILE%\.touchup\desktop). The web application keeps them in ~/.touchup/web. They are next to your global ~/.touchup/config.json, which does not change.
At the first start, when the new folder does not exist and the settings folder of an earlier version does, TouchUp copies its content once: the settings, the shortcuts and the recent workspaces, not the extensions and the logs. The old folder is never changed or deleted. The cache files of the operating system stay in the folder of the operating system.
Updates and removal
An installed application is replaced by the installer of a newer version. To remove it, use Apps and features on Windows, or delete the AppImage or the folder on Linux. Your settings and your backups are kept.
Security and releases
What a release gives you to check what you install:
- Signed Windows files. The Windows programs of an official release (the executables of the extension, the setup, the MSI and the portable package) carry a digital signature. Windows shows the publisher, and a security tool can check it. A preview release can be unsigned: Windows or Smart App Control can then block it.
- A list of components (SBOM). Each release has four files
touchup-<version>-<part>.cdx.json, one for the extension, the TouchUp service, the desktop application and the web application. They are in the CycloneDX format, a standard that security tools read. Each lists the software components that the part contains, with their versions and licenses, so that your IT team can check them against a list of known vulnerabilities. They list the components that are shipped, not the tools used to build TouchUp. - Checksums.
SHA256SUMS.txtgives the SHA-256 checksum of every file of the release, the SBOM files included. To check a download, compute the checksum of the file and compare it. On Windows:Get-FileHash <file> -Algorithm SHA256. On Linux:sha256sum -c SHA256SUMS.txt.
All these files are in the files of the release, next to the installers.