Data and I/O panels
The Data panel and the I/O panel of a Fanuc or Yaskawa controller: open them from the tree, choose the kind and the page of 50, edit several cells, then write them with one confirmation. Pending changes, Revert, the Pro edition, the cells that are read-only, Add to Watch, and Simulate and Unsimulate of a Fanuc signal.
- What the panels are
- Open a panel
- Choose what to show
- Edit values
- Write the changes
- Free and Pro
- Cells that cannot be edited
- Add to Watch
- The I/O panel
- Simulate a Fanuc signal
- The I/O panel of a Yaskawa controller
- Filter, search and sort
- Channels and signals
- Registers
- Values and writes
- Names
- Edit a name
- From a backup
- What to read next
This page explains the Data panel and the I/O panel of a controller: a table of registers or signals that you read, edit and write back. It applies to Fanuc and Yaskawa controllers. Reading is free. Writing needs the Pro edition, see Editions and license.
What the panels are
Each controller has a Data panel and an I/O panel. Both open as a tab of the editor, with a table of 50 rows of one kind. The I/O panel of a Yaskawa controller is different: it is the table of the manuals, see The I/O panel of a Yaskawa controller. A row has a reference, a value, a comment (or a name on Yaskawa) and an Add to Watch button.
The panels replace the Registers, Variables, I/O and Tasks views of the side bar, which are gone: the side bar keeps Controllers, Watch, Toolbox, Backups and Account. See Read live values. The panels edit many values at once, with one confirmation.
Open a panel
Open the nodes of the controller in the Controllers view:
| Brand | Data panel | I/O panel |
|---|---|---|
| Fanuc | Data > Registers, Position Registers, String Registers, KAREL Vars, KAREL Positions | I/O |
| Yaskawa | Data > Byte, Integer, Double, Real, String, Position, Base Position, External Position | I/O |
Data > Variable Map opens the Variable Map, see Navigate across a robot. The Fanuc node Variables opens the Variables panel, see Read live values.
A panel is named after the node and the controller, for example Data: Cell 3 Fanuc.
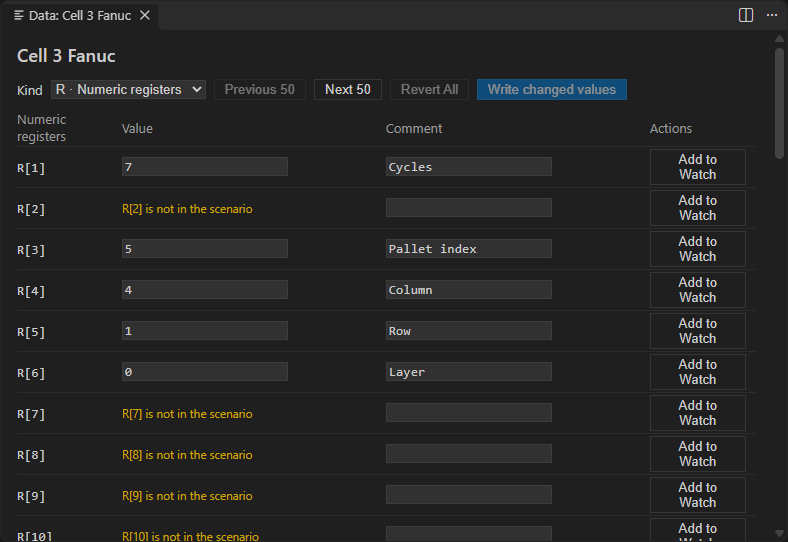
Choose what to show
| Control | What it does |
|---|---|
Kind | The list of kinds of the panel, for example R · Numeric registers on Fanuc or DI · Digital inputs in the I/O panel |
Previous 50, Next 50 | Show the 50 values before or after the current page |
The I/O panel of a Yaskawa controller has its own controls, see below.
The values are read again every second while the panel is visible. When you hide the tab, TouchUp stops reading. A register that the controller does not have shows is not in the scenario in orange, with no value.
Edit values
You can change several values, check them, then write them in one step. Nothing is sent to the controller until you click the write button.
- Click a cell and type the new value.
- Press
Enter, or click another cell. The new value is kept as a pending change. - Repeat for the other cells.
- Click
Write N changed values.
N is the number of changed cells. A value and a comment of the same row count as two.
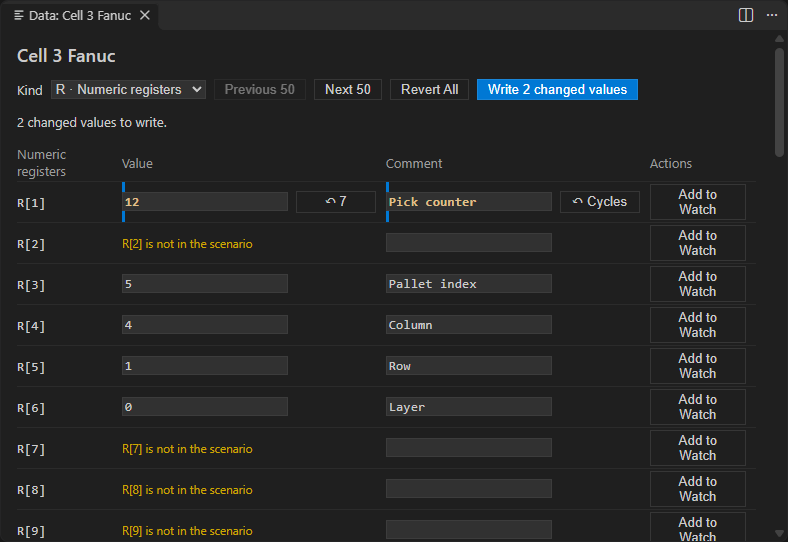
An edited cell has a blue bar on its left. Beside it, a small Revert button shows the value read from the controller, for example ↶ 7. The columns and the rows keep their size when you edit.
| Action | What it does |
|---|---|
Escape while you type | Puts the cell back, nothing is kept |
Revert (the small button of the cell) | Drops the pending change of one cell and brings back the value read |
Revert All | Drops every pending change of the panel |
Write the changes
Write N changed values sends only the changed values. TouchUp asks one confirmation for the whole panel. It lists each value with its old and new value. After Confirm:
- TouchUp reads each value again and shows the value that the controller holds.
- Each register or signal has its own record in the audit log.
- For a Yaskawa name, TouchUp first saves a copy of the name file of the controller. See Names.
- A value that the controller refuses stays pending. Its row shows
Not writtenunder the reference, and the reason is the tooltip of that text. The other values are still written.
Fix the cause of a refused value, then click the write button again. A pending change that you make while the confirmation is open is not sent. It stays pending.
The pending changes are kept in the panel only. When you close it, they are lost.
Free and Pro
A Free user can read and edit the cells. Write N changed values opens the Pro dialog and sends nothing. The pending changes stay in the panel.
Cells that cannot be edited
A read-only cell has no field. It shows a few words that say why, for example Simulate it to edit or Set by its device. Point at the words to read the full sentence in a tooltip.
| Cell | Why |
|---|---|
| A KAREL position of a Fanuc controller | It is shown, not edited, in the panel |
A position register or a Yaskawa position (P, BP, EX) | A position has several values. Click Open to edit it in the Position Editor, where a Fanuc position register can also change its form |
The name of a Yaskawa register (M000 to M999) or of a signal that has no user name | These have no name on the controller. See Names |
| A Yaskawa signal that is not a network input | See The I/O panel of a Yaskawa controller. The words beside the value say who sets it, for example Set by its device |
| The value of a Fanuc input | An input is set by its device. It takes a value once it is simulated |
When nothing can be written now, the panel says it once, in one line above the table: the controller is not connected, or it or its connection does not allow a write. The cells then show their values with no repeated reason. Point at a cell to read the line again in a tooltip.
Add to Watch
The Add to Watch button of a row adds that register or signal to the Watch view, for this controller. See Read live values.
The I/O panel
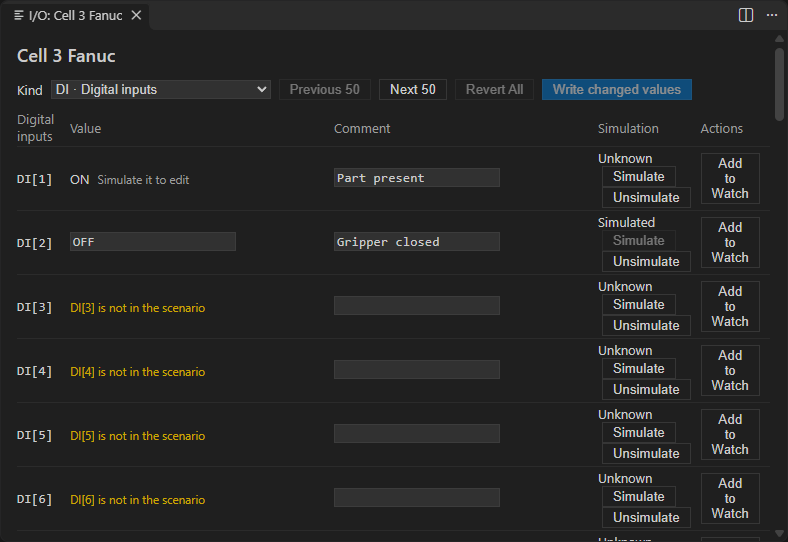
The I/O panel shows signals of one kind: DI, DO, RI, RO, GI, GO, AI, AO, UI, UO, SI, SO and flags on Fanuc, and the table of the manuals on Yaskawa. The comment of a Fanuc signal can be edited like a value.
Simulate a Fanuc signal
The Simulation column shows the state of each signal and two buttons.
| Button | What it does |
|---|---|
Simulate | Simulates the signal. Its value can then be edited |
Unsimulate | Puts the signal back under the control of its device |
Simulate and Unsimulate are actions, not pending changes. Each one asks its own confirmation and runs at once. They do not count in Write N changed values.
- The state is
Simulated, orUnknownwhen TouchUp does not know it. A real Fanuc controller showsUnknownuntil its SDK reports the state. - An input takes a value only while it is simulated. Until then, its cell says
Simulate it to edit. - The signals
F,UI,UO,SIandSOcannot be simulated (the controller gives a flag no simulation status). Their buttons are disabled.
The I/O panel of a Yaskawa controller
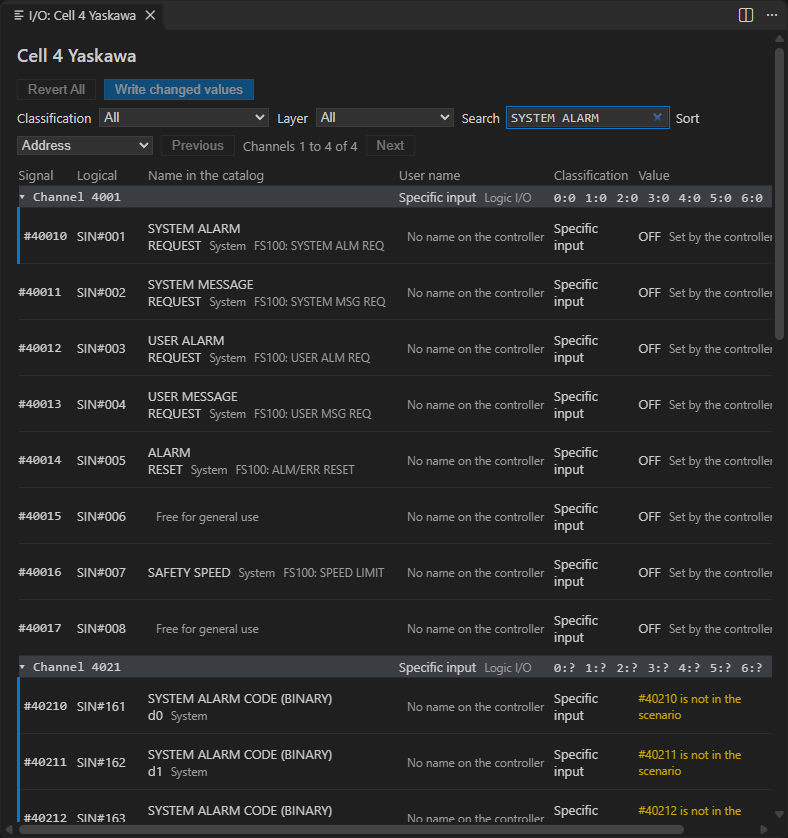
The I/O panel of a Yaskawa controller is the table of the I/O manuals: every relay number, with its logical name, its name, the name that you gave to it on the controller and its classification. After the relays, it lists the registers M000 to M999. It has no simulation. It replaces the four kinds IN#, OT#, IG# and OG# of the previous version.
Filter, search and sort
| Control | What it does |
|---|---|
Classification | Keeps one classification of the manuals, for example General purpose input, Network input, Specific input, Auxiliary relay or Control status. All shows everything |
Layer | Keeps one layer: Logic I/O, Physical I/O, Internal or Hard signal monitor |
Search | Looks for a relay number (80173), a register (M010), a logical name (SIN#001 or SIN#(1), IN#(9)) or a part of a name of the I/O signal catalog. On a connected controller it does not look in the user names, see Names |
Sort | Address, or Type, then address |
Previous, Next | Show the previous or next 6 channels. The range, for example Channels 1 to 6 of 120, is beside them |
Channels and signals
The table has one line per channel: a channel is the group of 8 signals of one byte, for example channel 4001 holds the relays 40010 to 40017. The line gives the classification, the layer and the state of the 8 bits, for example 0:1 1:0 2:0 ....
Click Channel <number> to open the line. It shows one row per signal:
| Column | What it shows |
|---|---|
Signal | The relay number, for example 40010 |
Logical | The logical name, for example SIN#001 |
Name in the catalog | The name of the signal in the I/O signal catalog of TouchUp, its use, and the names it has in other applications or controller generations when they differ |
User name | The name that you gave to the signal on the controller, see Names |
Classification | The classification of the manuals |
Value | The value read from the controller |
Actions | Add to Watch |
A search opens every channel that it lists, and marks the signals that it found. Without a search, the channels are closed.
Registers
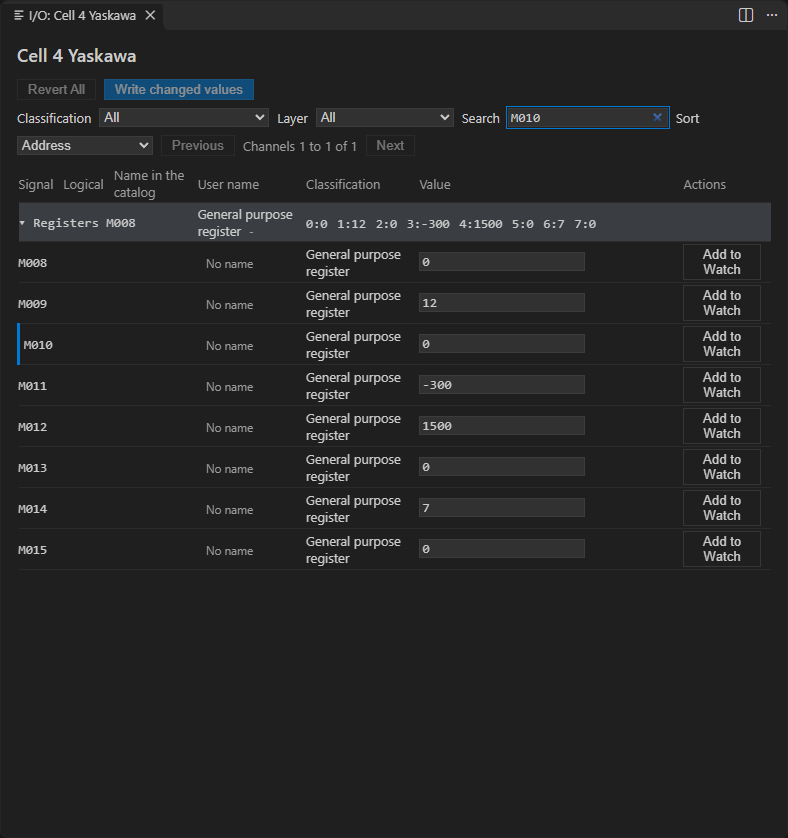
The registers M000 to M999 come after the relays, in lines of 8 registers: Registers M000, Registers M008, and so on. The line shows the 8 values, and opens like a channel to one row per register. A register is a whole number of 16 bits, from -32768 to 32767. It has no relay number, no logical name and no name in the catalog. The classification tells its kind: general purpose, analog output, analog input or system register. Search M010 to open the line of that register.
Values and writes
TouchUp reads the 6 channels of the page, as long as the panel is visible. When the controller is not connected, the table lists the signals with their names and their classification, without a value.
- A network input (relays
27010to29567) and a general purpose register (M000toM559) are edited like any other value: the edit becomes a pending change, andWrite N changed valueswrites it after the usual confirmation. A register takes a whole number from -32768 to 32767. See Edit values and Write values and control a program. - Every other signal is read-only: the analog output registers (
M560toM599), the analog input registers (M600toM639), the system registers (M640toM999) and every relay that is not a network input. The words beside its value say who sets it, and the tooltip gives the full reason.
Names
The column Name in the catalog gives the names of the I/O signal catalog. It is read-only.
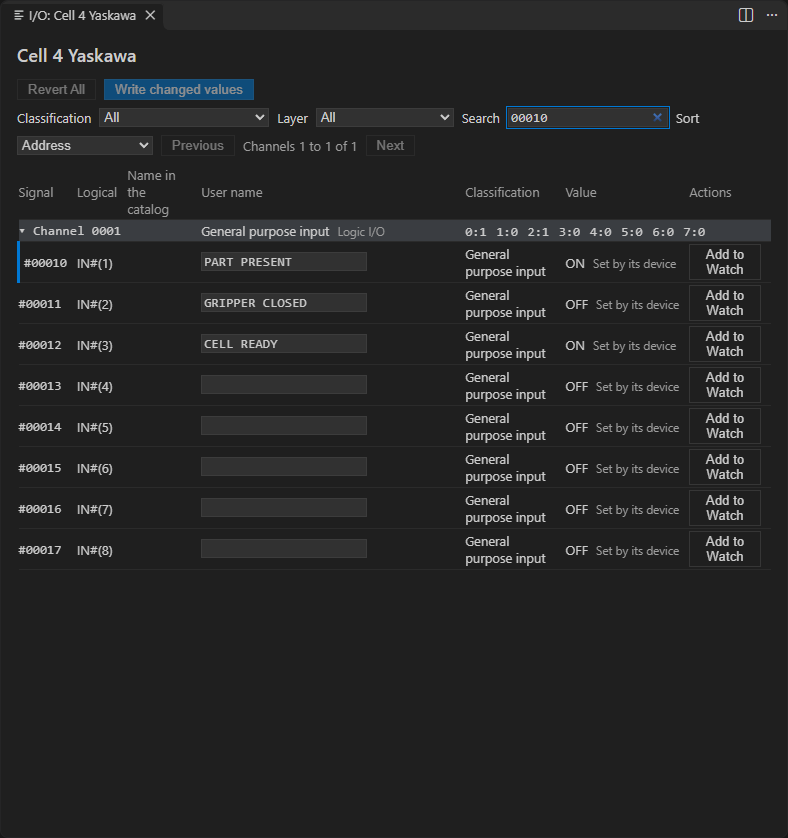
The column User name gives the names that you gave to the general purpose signals on the controller (IN#(n) and OT#(n)). The user names come from IONAME.DAT of the controller. You can edit them here. The registers and the other signals (network, external, specific) have no user name: their cell is read-only, with the reason beside it.
- On a connected controller, TouchUp reads
IONAME.DATonce, when it connects. A name that you change on the pendant shows after a new connection. When the controller refuses the file, the column stays empty and the panel shows no error. - On a connected controller, the search does not look in the user names. Search the relay or the logical name, then read the name in the column.
- In the panel of a backup, the search looks in the user names too, see Open the I/O panel of a backup.
- The names of the external signals (
EXIONAME.DAT) are not shown.
Edit a name
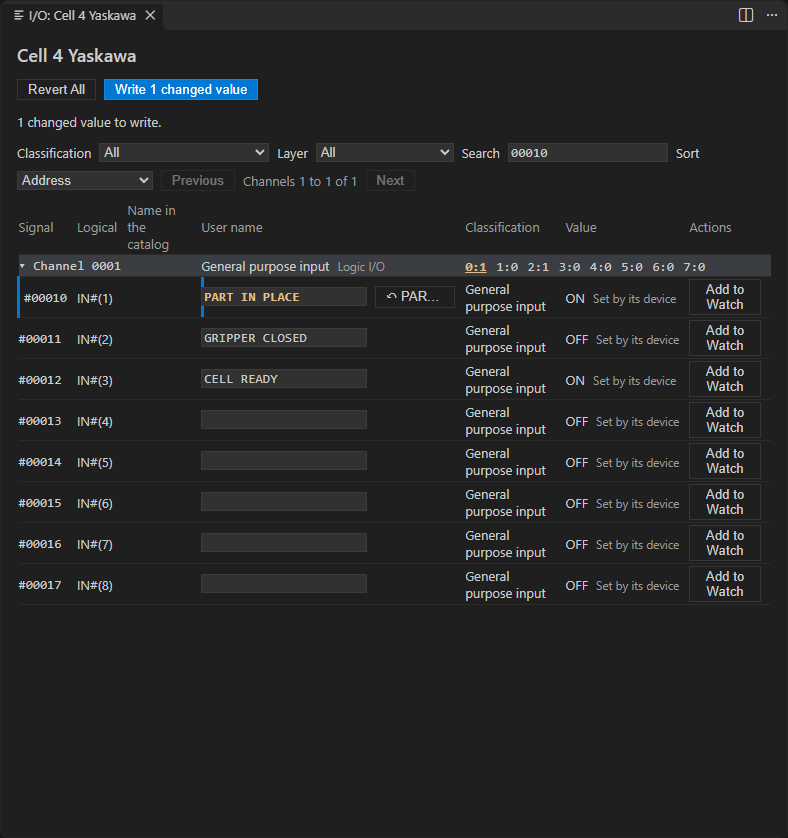
The name of a Yaskawa variable (B, I, D, R, S, P, BP, EX, column Name of the Data panel) and the user name of a general purpose signal (column User name of the I/O panel) are edited like a value, see Edit values.
- Click the name, type the new one and press
Enter. The name becomes a pending change, and a smallRevertbutton beside it shows the name read from the controller. - Click
Write N changed valuesandConfirm. A name and a value are written in the same step.
A name follows the rules of the controller files:
- 16 characters at most, printable ASCII only: letters, digits, spaces and signs.
- No comma, because it separates the names in
IONAME.DAT. - It does not start with
/, which marks a section title of the file. - An empty name clears the name.
A name that breaks a rule is refused with its reason, and nothing is sent to the controller.
Before it writes, TouchUp saves a copy of the name file that it will replace: VARNAME.DAT for a variable, IONAME.DAT for a signal. The audit record of the write points to that copy, see Write values and control a program. The write replaces the whole file: a name that someone changes on the pendant between the moment you click Confirm and the end of the write is lost.
The write needs the Pro edition, like a value, see Free and Pro. When the controller or its connection does not offer the way to write names, TouchUp refuses the name and says that the function is not available, with the reason. The position value of a P, BP or EX variable stays read-only, only its name can be edited.
From a backup
The same table opens from a backup, without a controller. See Open the I/O panel of a backup.